2000s Beach Nails: The Ultimate Guide


2000s Beach Nails: The Ultimate Guide
The 2000s were a time of bold fashion and beauty statements, and beach nails were no exception. From bright colors and intricate designs to chunky glitter and rhinestones, there was no shortage of ways to show off your personality on your fingertips.

If you're looking to recreate the 2000s beach nail trend, here are a few tips:


- Start with a base coat. This will help to protect your nails and ensure that your polish stays on longer.
- Choose a bright color. The 2000s were all about color, so don't be afraid to go bold with your nail polish choice. Some popular colors from the era include hot pink, fuchsia, cobalt blue, and lime green.
- Add a design. If you want to take your beach nails to the next level, add a fun design. You can use a toothpick or nail art brush to create stripes, polka dots, or other shapes. You can also use glitter, rhinestones, or other embellishments to add some sparkle.
- Seal it with a top coat. This will help to protect your design and keep your nails looking their best.
Here are a few specific examples of 2000s beach nail designs:

- French tips with glitter: This classic design is always a good choice for a beach day. Paint your nails white, then add a thin line of glitter to the tips.
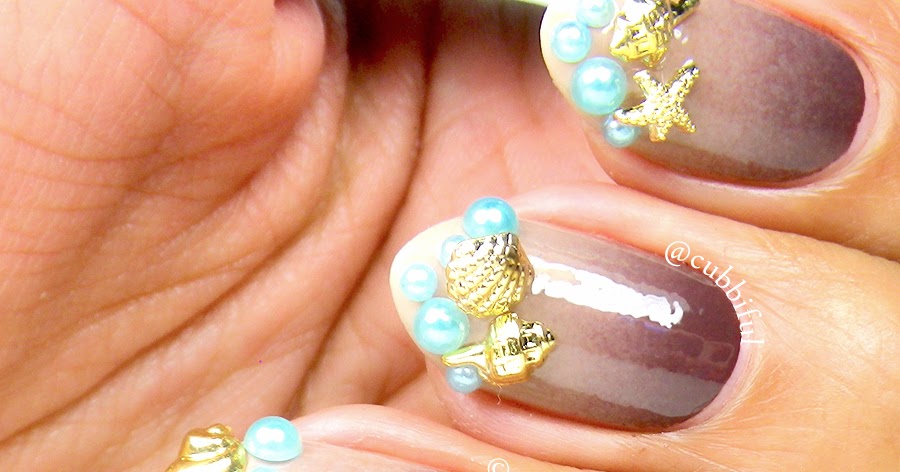
- Ombre nails: This ombre design is easy to do and looks great on any skin tone. Start by painting your nails with a light color, then gradually add darker colors to the tips.
- Sunburst nails: This fun design is perfect for a summer day. Paint your nails with a base color, then use a small brush to create a sunburst design in a contrasting color.
- Animal print nails: This wild design is sure to turn heads. Paint your nails with a base color, then use a nail art brush to create animal print shapes.


No matter what your style, there's a 2000s beach nail design that's perfect for you. So get creative and have some fun with your nails this summer!
Here are some additional tips for creating 2000s beach nails:

- Use a thin nail brush. This will help you to create precise lines and designs.
- Work in a well-ventilated area. Nail polish fumes can be strong, so it's important to work in a place where you can get plenty of fresh air.
- Clean up any mistakes immediately. If you make a mistake, don't wait to fix it. The sooner you clean it up, the easier it will be to remove.
- Don't forget to moisturize your hands. Nail polish can dry out your skin, so it's important to moisturize your hands after you're finished painting your nails.

With these tips, you'll be able to create the perfect 2000s beach nails for your next summer vacation. So get started and have some fun!
2000s Beach Nails: The Best Nail Art Trends of the Decade
The 2000s were a time of bold fashion statements, and nail art was no exception. From bright colors and glitter to intricate designs, there was no shortage of ways to express your personality through your nails. If you're looking to channel the nostalgia of the 2000s, here are some of the best beach nail art trends from the decade:
1. Neon Colors
Neon colors were all the rage in the 2000s, and they're still making a comeback this year. If you want to add a pop of color to your beach nails, try a bright neon polish. You can also mix and match different colors for a more eclectic look.
2. Glitter
Glitter was another popular nail art trend in the 2000s, and it's still going strong today. You can add glitter to your nails in a variety of ways, such as using a glitter polish, glitter decals, or glitter nail art stickers.
3. Intricate Designs
If you're feeling creative, you can try your hand at some intricate nail art designs. This could include anything from simple geometric shapes to more complex floral or animal prints. You can find plenty of inspiration for intricate nail art designs online or in nail art magazines.
4. Shells and Seashells
Shells and seashells were a popular beach nail art trend in the 2000s, and they're still a great way to add a touch of beachy flair to your nails. You can use real shells or seashells, or you can find shell-shaped nail art stickers or decals.
5. Sand
Sand is another great way to add a beachy touch to your nails. You can use real sand, or you can find sand-colored nail art polish or stickers.
6. Palm Trees
Palm trees are a classic beach symbol, so they're a natural choice for beach nail art. You can use palm tree-shaped nail art stickers or decals, or you can freehand your own palm tree design.
7. Waves
Waves are another popular beach nail art design. You can use wave-shaped nail art stickers or decals, or you can freehand your own wave design.
8. Fish
Fish are a fun and whimsical way to add a beachy touch to your nails. You can use fish-shaped nail art stickers or decals, or you can freehand your own fish design.
9. Seahorses
Seahorses are another great option for beach nail art. You can use seahorse-shaped nail art stickers or decals, or you can freehand your own seahorse design.
10. Starfish
Starfish are a classic beach symbol, so they're a natural choice for beach nail art. You can use starfish-shaped nail art stickers or decals, or you can freehand your own starfish design.
Tips for Getting the Best Beach Nail Art
Here are a few tips for getting the best beach nail art:
- Use a good base coat to protect your nails.
- Apply two coats of nail polish for a more opaque finish.
- Seal your nails with a top coat to protect your polish and extend the wear.
- If you're using glitter or other loose embellishments, apply them over a top coat to prevent them from falling off.
- Be creative and have fun! The 2000s were a time for bold fashion statements, so don't be afraid to experiment with different colors, designs, and embellishments.